

Leora J. Goodin
I'm a blogger dedicated to sharing insights on lifestyle and wellness. Through personal stories and practical tips, I aim to inspire and empower my readers to lead healthier, more fulfilling lives.
Black Friday and Cyber Monday 2023 Deals for Motion Designers, grab it now!
Students and teachers save a massive 71% on Creative Cloud All Apps
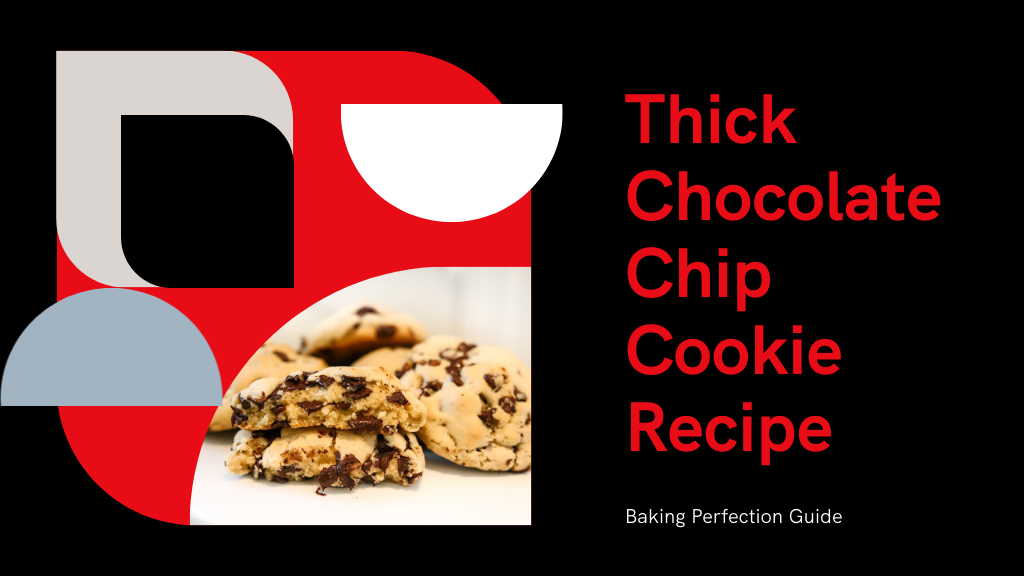
Hunting for the ultimate thick chocolate chip cookie recipe? Discover the secret steps that guarantee irresistible, gooey perfection every single time.

To make perfect thick chocolate chip cookies, start by gathering high-quality ingredients like cake flour and good cocoa chips, and measure your flour precisely. Cream cold, pliable butter with sugars until fluffy, then mix in eggs and vanilla well. Whisk dry ingredients separately before gradually combining with wet. Fold in the chocolate, chill the dough thoroughly, and shape into thick mounds. Bake at the right temperature, monitoring closely for that ideal golden edge and gooey center. Follow these tips for more baking secrets.
Before you begin baking, make sure you gather high-quality ingredients, as they’re key to achieving the perfect chocolate chip cookie. For a thick chocolate chip cookie recipe, start with cold yet pliable unsalted butter to prevent excessive spreading. Choose cake flour over all-purpose flour—it’s essential for how to make thick cookies that are tender and soft.
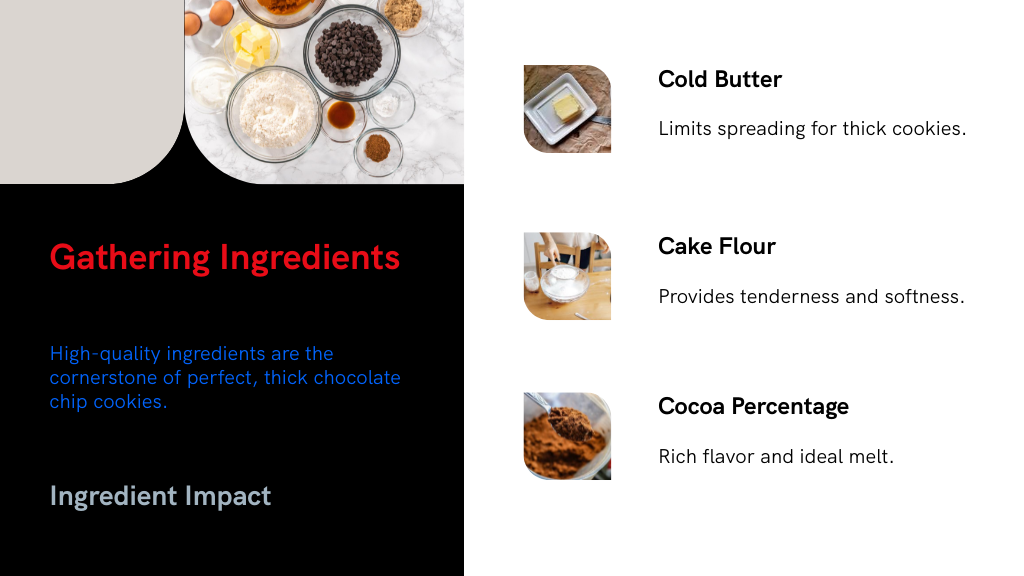
Pick chocolate chips containing at least 55% cocoa solids to get that rich flavor and ideal melt. Use a mix of light and dark brown sugar to deepen flavor and add moisture.
Don’t forget fresh baking powder and cornstarch; they’re vital for the right rise and texture. Quality ingredients make all the difference in baking thick, chewy cookies that everyone will love.
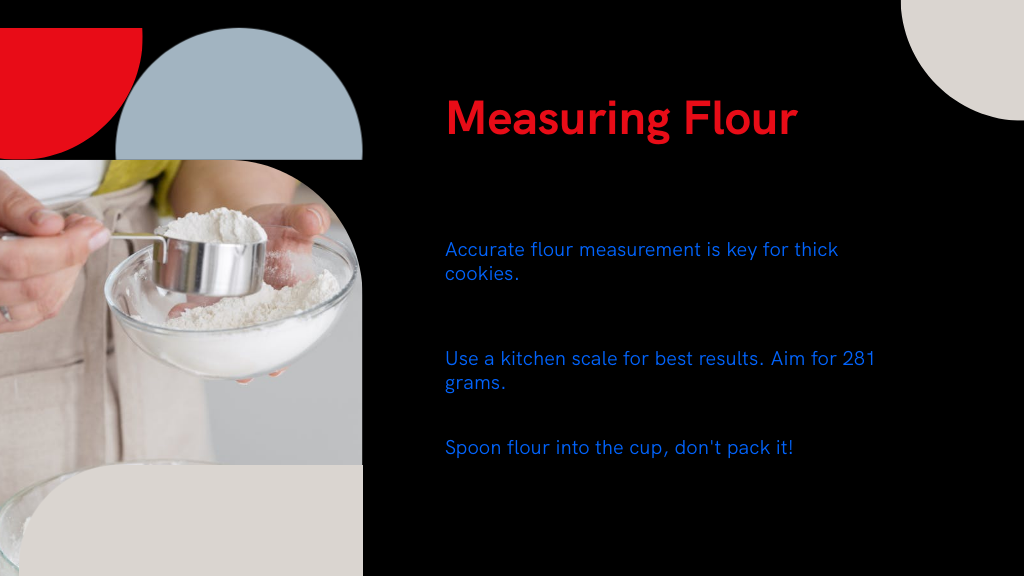
Accurately measuring flour is essential when making thick chocolate chip cookies, so you’ll want to use a kitchen scale whenever possible. Aim for 281 grams (about 2¼ cups) to avoid overmeasuring, which can dry out your cookies and make them cakey by increasing gluten development.
If you don’t have a scale, spoon sifted or whisked cake flour into your measuring cup without packing it down, then level it off with a straight edge. Cake flour is preferred because its lower protein content yields a thicker, more tender cookie, but you can substitute all-purpose flour if you weigh it correctly.
Taking these steps guarantees your flour measurement is precise, setting the foundation for thick, chewy chocolate chip cookies every time.

Start by creaming cold but pliable butter with both granulated and brown sugars until the mixture is light and fluffy, which usually takes about 2 to 3 minutes.
Using cold butter helps limit spreading during baking, keeping your cookies thick. Stick to a 1:2 ratio of granulated to brown sugar to add moisture and chewiness.
As you cream, air gets incorporated into the dough, which softens the cookie’s texture. Be careful not to over-cream; too much mixing can make your cookies cakey instead of thick.
Remember to scrape down the sides of the bowl regularly to guarantee all the sugar and butter combine evenly. This step is key to a consistent cookie structure and perfect thickness.
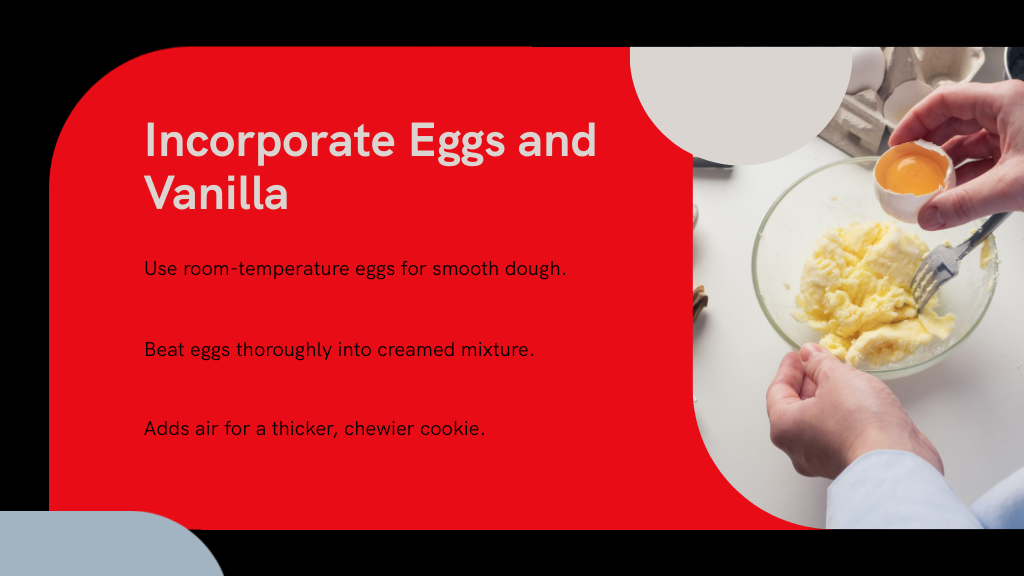
Once your butter and sugars are perfectly creamed, you'll want to incorporate two room-temperature eggs and a teaspoon of high-quality vanilla extract.
Using eggs at room temperature helps the dough come together smoothly, ensuring better emulsification and a uniform texture. Beat the eggs into the mixture thoroughly; this not only combines the ingredients but also aerates the dough, contributing to a thicker, chewier cookie.
The vanilla extract enhances the flavor, making your cookies more aromatic and delicious. For an even richer and chewier result, you might consider adding an extra egg yolk.
The additional fat from the yolk improves moisture and texture without weighing down the dough, helping you achieve that perfect balance between softness and thickness.
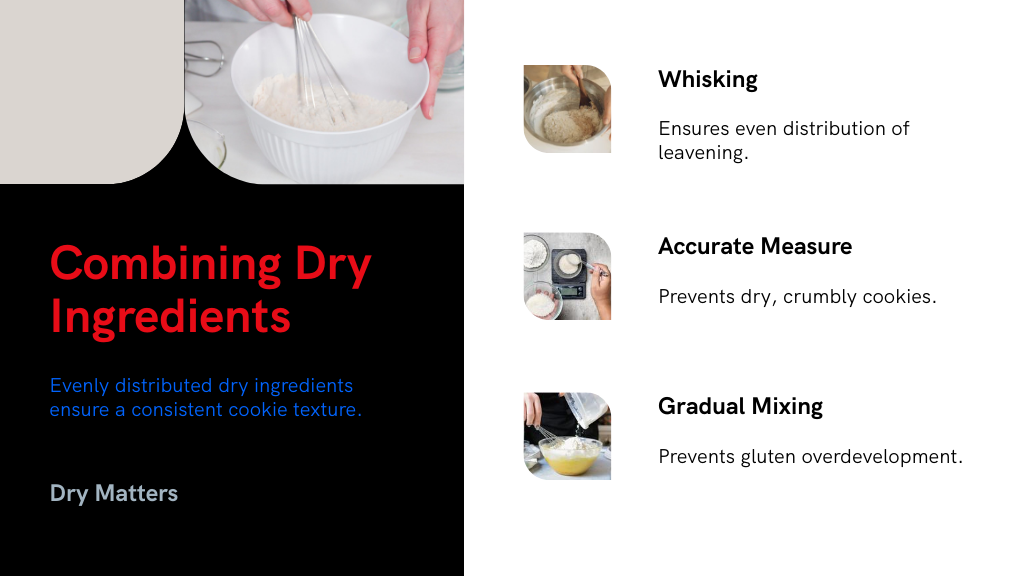
Before you add the dry ingredients to your wet mixture, it's important to combine them separately. Whisk together the flour, cornstarch, baking powder, baking soda, and salt in a separate bowl. This guarantees the leavening agents are evenly distributed, preventing clumps and promoting consistent cookie texture.
Using a kitchen scale to measure your flour accurately helps avoid overmeasuring, which can make cookies dry and crumbly instead of thick and tender. Gradually mixing the dry ingredients into the wet mixture in multiple additions gives you better control over the dough’s consistency.
This careful approach also helps prevent gluten overdevelopment, which would otherwise make your cookies tough. Taking these steps sets the foundation for perfectly thick, soft, and delicious chocolate chip cookies.
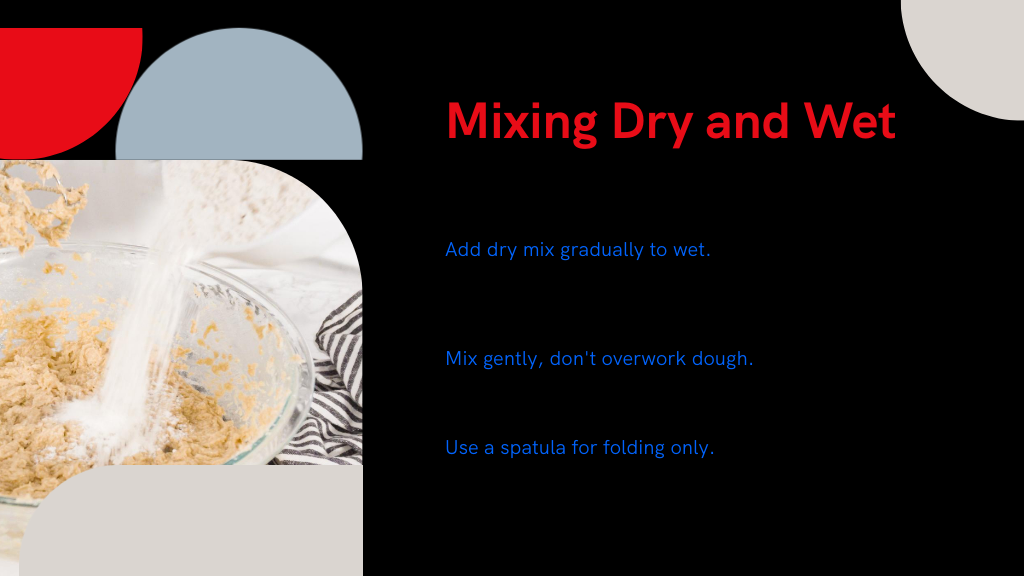
When you combine the dry and wet ingredients, take your time and add the dry mixture gradually. Mixing gently is key to avoiding overworked dough, which can make your cookies tough. Use a spatula to fold just until everything comes together for a soft, tender cookie.
Although it might be tempting to mix the dough vigorously, you should gently fold the dry ingredients into the wet ones to keep your cookies tender and thick.
Use a spatula or wooden spoon instead of a mixer, stopping as soon as no dry flour remains—even if small lumps linger. Overmixing develops gluten, making cookies tough and compromising their soft texture. Your aim is a uniform dough that stays soft and thick.
After mixing, let the dough rest by chilling it for at least 30 minutes. This step enhances texture, even if you handled the dough carefully.
Now that you've mastered folding the dough gently to keep it tender, the next step is to add your dry ingredients gradually. This helps prevent gluten overdevelopment, which can make cookies tough instead of thick and soft.
For best results, alternate adding the dry mixture with the wet ingredients in two or three additions. Mix just until combined using a spatula or wooden spoon to avoid overmixing and preserve the cookie’s structure.
Adding ingredients slowly guarantees even distribution of leavening agents like baking soda, helping your cookies rise perfectly. Also, make sure all ingredients are at room temperature before you start—this makes incorporation smoother and results in a better texture. Taking these steps will keep your cookies tender and thick, just the way you want them.
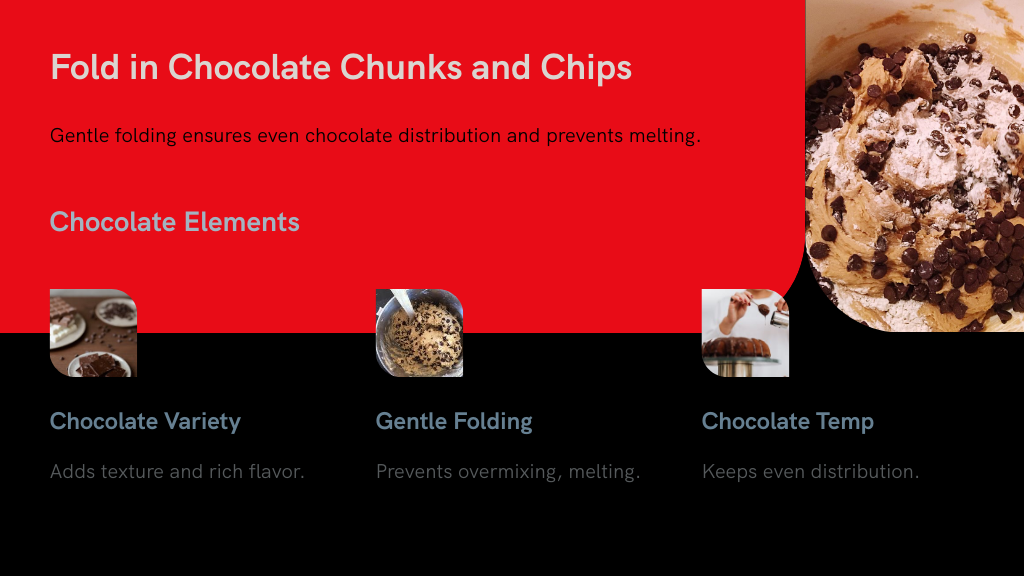
When you fold in chocolate chunks and chips, choosing the right variety can really boost your cookie’s flavor. Mixing different types, like dark and milk chocolate, adds a nice texture and richness. Just be sure to fold gently so your dough stays thick and those chocolate pieces spread evenly.
Selecting the right chocolate varieties is key to making your cookies unforgettable. Aim for high-quality chunks or chips with a cocoa content between 55% and 70% to achieve a rich, balanced sweetness.
Don’t hesitate to mix semisweet and dark chocolates—this blend layers complex flavors that elevate each bite. Chopped chocolate bars are a great addition, offering a melty texture that creates gooey pockets throughout your cookies, unlike traditional chips.
To make sure every cookie bursts with chocolate, use at least two cups per batch. Remember, the type of chocolate you choose directly impacts the taste and texture, so pick wisely to get that perfect thick, indulgent cookie you’re craving.
To keep those high-quality chocolate chunks and chips from melting prematurely or clumping unevenly, you’ll want to fold them into your dough gently using a spatula.
This careful folding prevents overmixing, which keeps your cookies thick and tender. Make sure your chocolate is at room temperature; cold chocolate can cause clumping, while warm chocolate might melt and alter the dough’s texture.
For even distribution, divide the chocolate into smaller portions and fold them in stages, ensuring every bite has the perfect balance of gooey chocolate.
Using chocolate with 55% to 70% cocoa content enhances flavor and melting quality, giving your cookies that irresistible richness and texture you’re aiming for.

Although it might be tempting to bake the dough right away, chilling it for at least 30 minutes is key to thicker cookies that spread less. When you refrigerate the dough, the fats solidify, helping the cookies hold their shape better during baking.
For even richer flavor and improved texture, aim to chill the dough for 2-3 hours or up to 3 days, allowing the flour to fully hydrate. It’s best to roll the dough into loose balls before chilling, keeping them lumpy and tall rather than perfectly smooth.
If your dough feels too hard after chilling, let it sit at room temperature for about 15 minutes to soften slightly. You can also freeze dough balls for at least 90 minutes to reduce spread and achieve thickness.
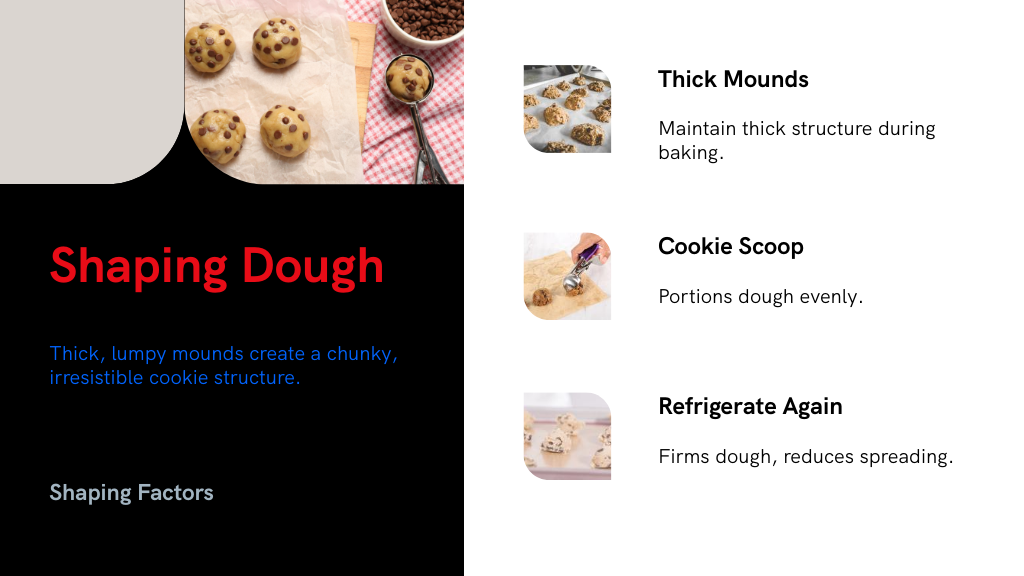
A thick, chunky cookie starts with shaping your dough into mounds about 1½ inches tall.
Don’t flatten the dough balls; keeping them lumpy helps maintain that thick structure as they bake. Use a medium cookie scoop to portion the dough evenly, aiming for roughly 120 grams per mound. This consistency guarantees your cookies bake uniformly, avoiding thin, crispy edges.
After shaping, refrigerate the dough mounds for at least 30 minutes. Chilling firm dough holds the shape better and reduces spreading, so your cookies stay thick and chunky.

You’ll want to preheat your oven to 375°F (190°C) to get the perfect bake every time. Baking your cookies for about 13-14 minutes guarantees they’re golden on the outside with a soft center. Keep an eye on them so they don’t overbake and lose that ideal texture.
Three key factors determine the perfect chocolate chip cookie texture: temperature, time, and oven consistency. For thick cookies, baking at 375°F (190°C) hits the sweet spot, giving you a crispy outside and a soft, gooey center. If your cookies are extra thick, lower the temp to around 350°F (180°C) to cook them evenly without spreading too much.
Before you start, preheat your oven for at least 10-15 minutes to guarantee even heat, which helps your cookies rise and bake properly.
Since many ovens can be off by as much as 25°F (14°C), it’s smart to use an oven thermometer to double-check the temperature. This way, you’ll nail the ideal baking temperature every time.
Although baking time can vary based on cookie size and oven type, aiming for 13-14 minutes at 375°F (190°C) usually gives you that perfect golden outside with a gooey center.
Make sure you chill your dough for at least 30 minutes beforehand to help your cookies hold their shape and rise nicely. Using a pre-heated dark baking tray promotes even baking, giving you a crisp exterior and soft, chewy inside.
Keep a close eye near the end—you might see under-baked centers, but they’ll firm up as they cool. If you’re working with larger, 6-ounce portions, extend baking to about 22 minutes, watching for golden edges and a puffed appearance to know they’re done just right.

Now that you’ve gathered quality ingredients, measured with care, and creamed your butter and sugars just right, you’re ready to mix, chill, shape, and bake. You’ll fold in chocolate chunks, chill the dough thoroughly, shape thick mounds, and bake at the perfect temperature. By following these steps, you’ll create cookies that are thick, chewy, gooey, and utterly irresistible. So go ahead—bake confidently, enjoy fully, and share generously!

I'm a blogger dedicated to sharing insights on lifestyle and wellness. Through personal stories and practical tips, I aim to inspire and empower my readers to lead healthier, more fulfilling lives.
Your email address will not be published. Required fields are marked *