

Leora J. Goodin
I'm a blogger dedicated to sharing insights on lifestyle and wellness. Through personal stories and practical tips, I aim to inspire and empower my readers to lead healthier, more fulfilling lives.
Black Friday and Cyber Monday 2023 Deals for Motion Designers, grab it now!
Students and teachers save a massive 71% on Creative Cloud All Apps

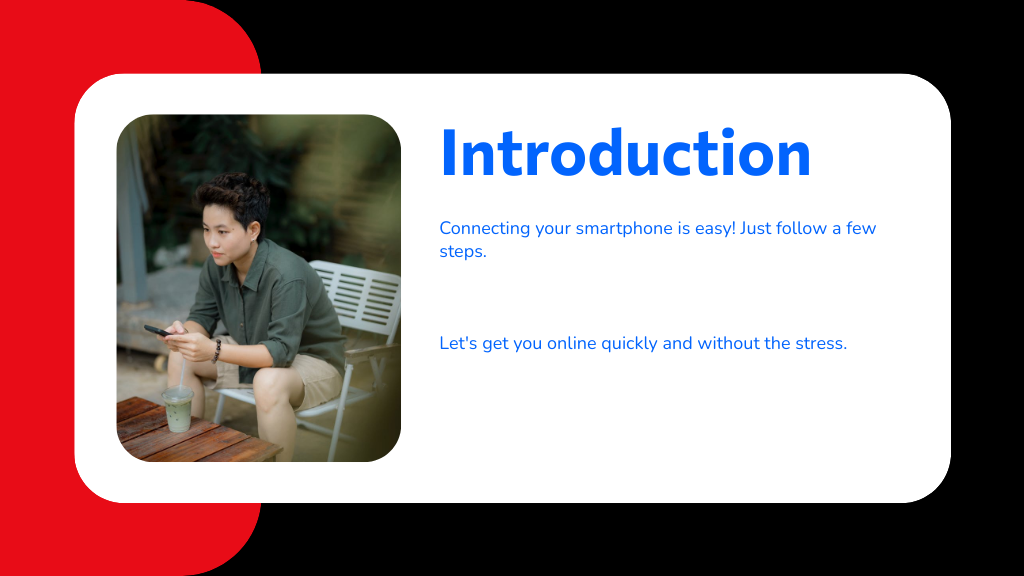
From inserting your SIM card correctly to configuring APN settings, find out how to connect your smartphone to a network effortlessly and stay always online.
To connect your smartphone to a network, first insert a compatible SIM card properly and restart your device. Then, enable mobile data in settings and guarantee you have network coverage. Check that your Access Point Name (APN) settings match your carrier's requirements to access mobile internet. If your phone is locked, you may need to release it for full network use. Ready to make certain your connection is seamless? Understanding these steps deeper can help you troubleshoot and optimize your device.
To prepare your Android device for a network connection, start by making certain the SIM card is the right size, properly inserted, and undamaged. Next, you’ll want to turn on internet access by enabling mobile data in your Settings.
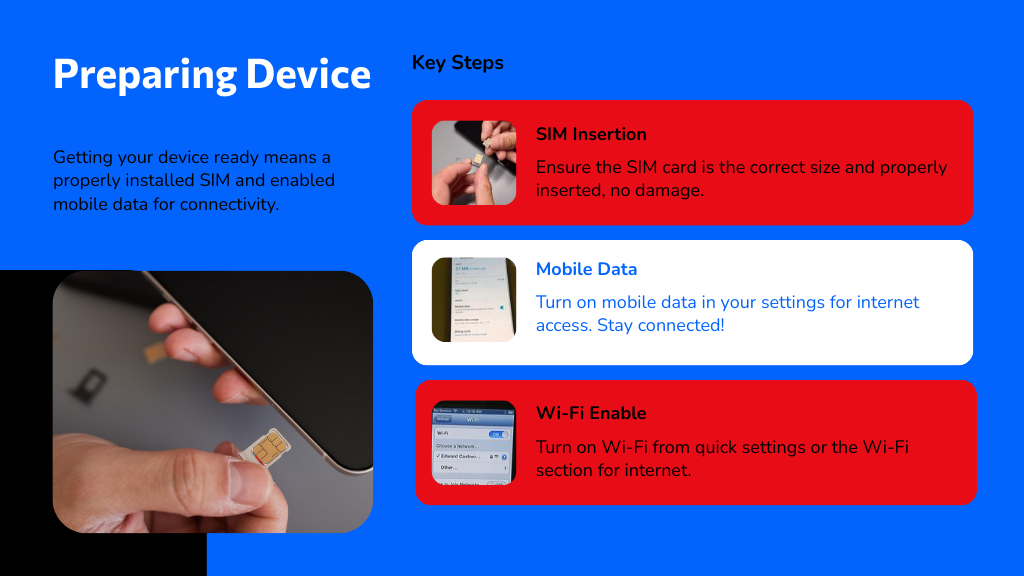
Enable mobile data in your Settings to turn on internet access and stay connected on the go.
If you’re wondering, “how do I connect my phone to Wi-Fi?” simply turn on Wi-Fi from the quick settings menu or the Wi-Fi section in Settings.
Check that your device has cellular coverage and that the Access Point Names (APN) settings match your carrier’s requirements to guarantee a smooth connection.
After inserting a new SIM card, restart your device to complete activation. These steps help you turn on internet and Wi-Fi smoothly for uninterrupted connectivity.
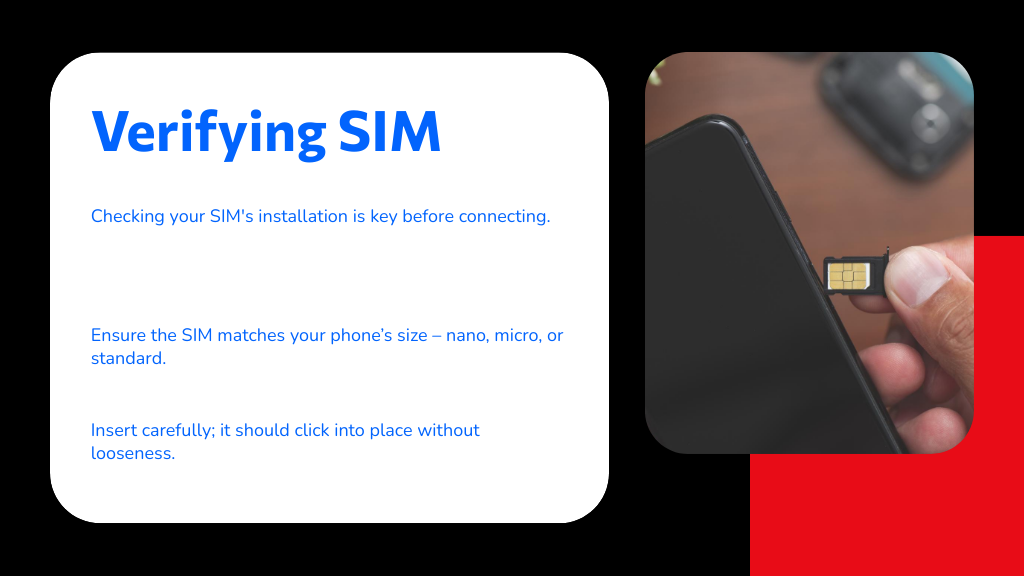
Checking your SIM card's installation and compatibility is essential before connecting your smartphone to a network. First, make sure your SIM card matches your phone’s required size—nano, micro, or standard—by consulting your device specs. Insert the SIM card carefully, making certain it clicks into place without any looseness or misalignment.
Inspect the SIM card for any visible damage like scratches or cracks that could disrupt connectivity. If you’ve had the SIM unused for a while, consider getting a new one from your carrier to stay compatible with current network standards.
Finally, verify your smartphone is accessible or supports your carrier’s network to avoid connection problems. Taking these steps will help guarantee a smooth experience when connecting a smartphone to network services.
Enabling mobile data on your smartphone only takes a few taps in the Settings menu, where you can toggle the mobile data option on.
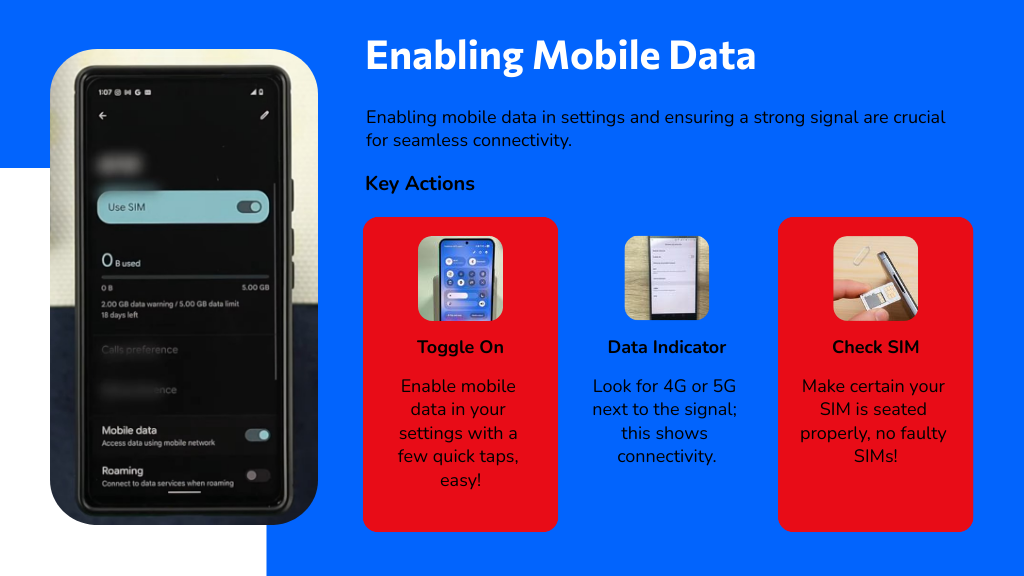
Once activated, look for a data indicator like 2G, 3G, 4G, or 5G next to the signal strength icon; this confirms your device is connected to the network.
If you don’t see a signal, try moving to a different location since network coverage varies. Also, double-check that your SIM card is properly seated and working, as a faulty SIM can block data access.
Should problems persist, contacting your mobile carrier is a good step—they can help resolve coverage issues or check if your device is blocklisted. This guarantees you stay connected and enjoy mobile data services seamlessly.
To configure your APN settings, you’ll need to know where to find them on your device—Samsung and Pixel phones have slightly different paths.
Before making any changes, double-check that your phone model is compatible with your carrier’s network to avoid connectivity problems. Always consult your carrier for the correct APN details to guarantee a smooth connection.
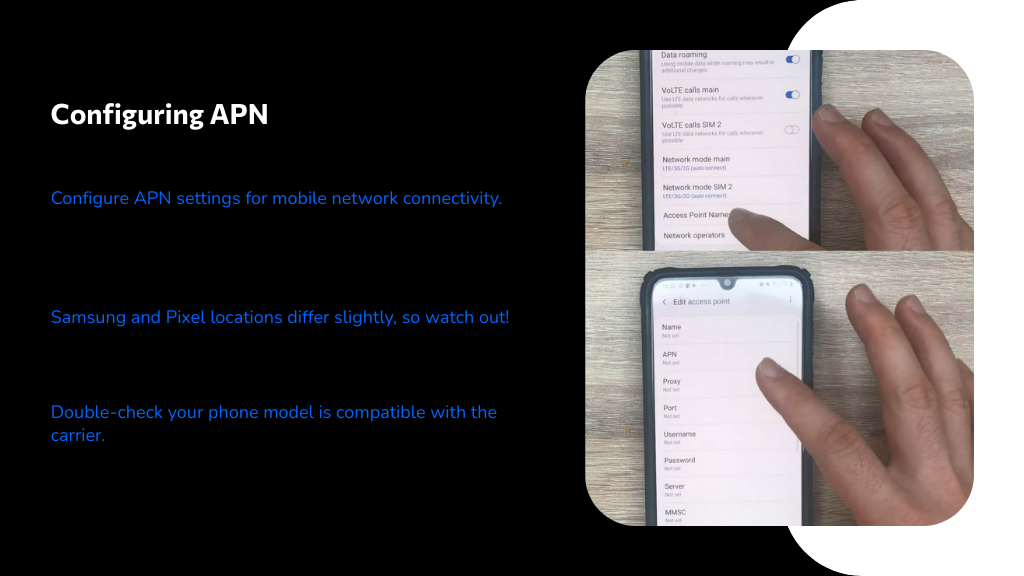
One key step in connecting your smartphone to a mobile network is configuring the Access Point Name (APN) settings. These settings tell your device how to connect to your carrier’s cellular data network, so entering them correctly is vital. On Samsung, go to Settings > Connections > Mobile networks > Access Point Names, then select the right APN.
For Pixel devices, head to Settings > Network & Internet > Mobile network > Advanced > Access Point Names to choose the appropriate one.
Always check with your carrier for the exact APN details before making changes. Incorrect settings can block mobile internet access, while updating them often fixes data issues. Proper APN location settings guarantee your phone connects smoothly to your carrier’s network wherever you are.
Why is checking carrier compatibility essential before configuring your APN settings?
If your Android device isn't compatible with your carrier's network, incorrect APN settings can prevent internet access. To avoid connectivity issues, always verify the correct APN details with your carrier before making changes.
On Samsung phones, you can find APN settings under Settings > Connections > Mobile networks > Access Point Names. For Pixel devices, go to Settings > Network & Internet > Mobile network > Advanced > Access Point Names.
Manually editing these settings without confirming their accuracy can disrupt your mobile data connection. Ensuring carrier compatibility and using the precise APN settings will help your smartphone connect smoothly to the internet through your mobile network.
To use your smartphone on a new network, you'll need to release it through the settings menu and follow the network release prompts.
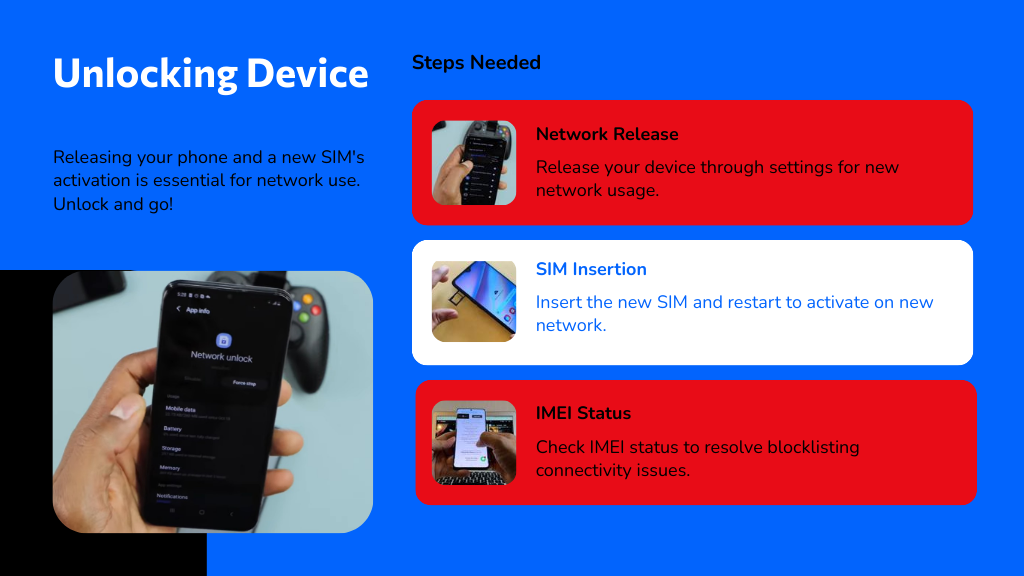
After inserting the new SIM card, restart your device to trigger activation and guarantee it works properly. If you run into issues, checking your device’s IMEI status can help resolve blocklisting problems.
Before you can use your Android device with a new carrier, you'll need to release it through the network release process. Start by directing yourself to Settings > Connections > More connection settings > Network release, then follow the prompts. Before releasing, verify your device supports the new carrier’s network frequency bands.
Insert the new SIM card, and if you see another carrier’s logo at startup, complete the activation with the new SIM inserted. Afterward, restart your device to trigger the release and allow proper network recognition.
Also, use an IMEI checker to confirm your device isn’t blocklisted, as a blocklisted phone won’t connect to the new network. Following these steps guarantees your device is properly released and ready for network use.
Although inserting a new SIM card is vital, you'll need to restart your Android device to trigger the activation process and facilitate network connectivity.
Before doing this, make sure your device is network freed by going to Settings > Connections > More connection settings > Network unlock.
Once you insert the SIM card and restart, your phone should begin activating on the new network. If you see another carrier’s logo, follow any on-screen prompts or adjust settings to complete activation.
Should you encounter activation problems, check your device’s IMEI status for blocklist issues. If problems persist, contact customer support for further help. Restarting is essential, as it lets your phone properly register with the network and guarantees smooth connectivity.
If you’re having trouble connecting your smartphone to a network, there are several key areas you should check to quickly identify the problem. First, make certain mobile data is enabled in your settings and look for a data indicator like 4G or 5G next to the signal icon.
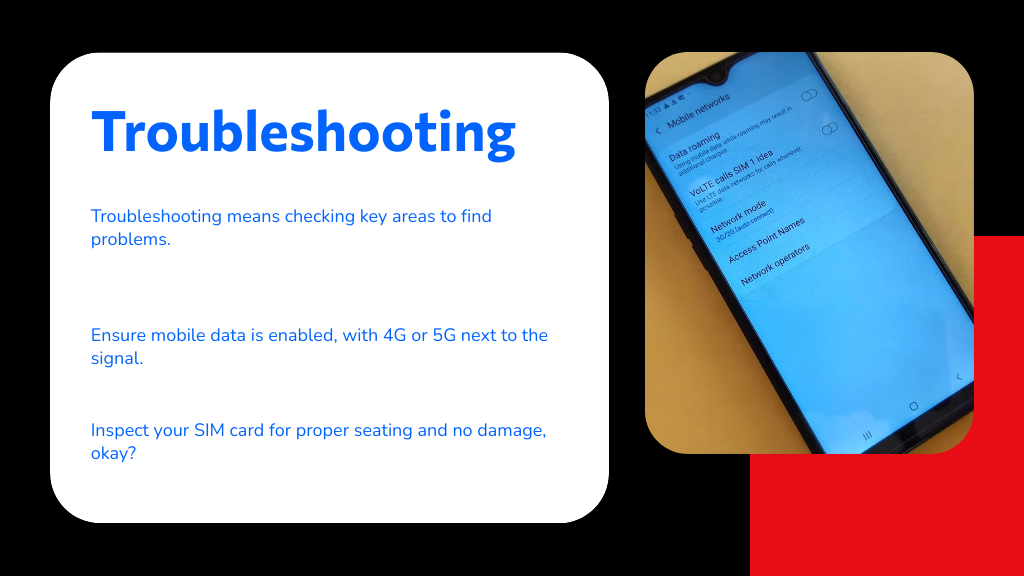
Next, inspect your SIM card to confirm it’s seated properly and undamaged. Also, verify your device isn’t blocklisted, as this can block network access. Updating your Android to the latest system version can fix bugs affecting connectivity.
If problems persist, contact your carrier to confirm network coverage in your area and ascertain your APN settings are correct. These steps usually resolve most connection issues efficiently.
When troubleshooting network issues, knowing your device's IMEI number can be a big help. This unique 15-17 digit code identifies your phone on cellular networks and is essential for revealing or checking if it’s blocklisted.
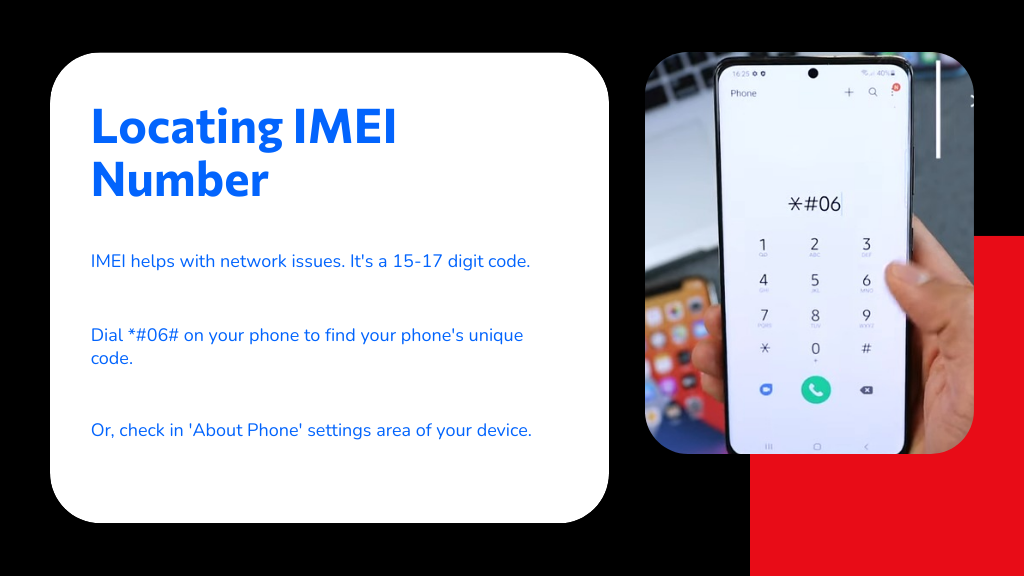
To find your IMEI number, you have several easy options:
Knowing your IMEI streamlines network support and device verification.
Connecting your smartphone to a network might seem tricky at first, but once you follow these simple steps, you’ll be online in no time. You might worry about complicated settings like APNs or gaining access to your device, but don’t stress—they’re easier to handle than you think. With a little patience and the right guidance, you’ll stay connected effortlessly. So, go ahead, get your device ready, and enjoy seamless network access wherever you are!


I'm a blogger dedicated to sharing insights on lifestyle and wellness. Through personal stories and practical tips, I aim to inspire and empower my readers to lead healthier, more fulfilling lives.
Your email address will not be published. Required fields are marked *